 UK
UKShopping Cart:
Your cart is currently empty.
NEED A LITTLE MORE?
-

-
-
 Shiny Wedding Sho... $19.99
 -

-
 Sparkly Luxury Pe... $19.99
 -

-
-
 Layered Heart Nec... $23.99


Total:
$0.00
Tips & Guide
How to Measure for a Bridesmaid Dress
Before choosing a bridesmaid dress, do you want to know how to measure out the exact body data? The answer is here. This article will tell you how you can get the right measurements at home.
- Necessary Measurements:
- Basic Necessary Measurements: bust, waist, hips, hollow to floor(bare), height(bare), and height of high heels.
- Additional Measurements for Plus-Sized Women: belly (widest waist), butt, and hollow to belly.
- Sleeve and Partially Sleeveless Measurements: arm length, armhole, biceps, and cuff.
- Hollow to Hem: mini length, above-knee length, knee length, tea length, ankle length, and floor length.
Part One: Preparation Before Measuring
Items Prepared in Advance
- A flexible, inelastic tape measure/tape measure with handle for measuring
- High heels that you intend to wear on the wedding day
- A Pencil and a piece of paper for recording measurements
- A full-length mirror that can help you measure better (optional).
Some Precautions
- Check the tape measure for creases or mutilations.
- Pay attention to the position of the zero mark on the tape measure.
- It is best to have a friend help you with the measurement.
- The best time of day to take your body measurements is in the morning.
Part Two: Basic Steps for All Measurements
Step 1: Stand naturally without hunching over to find the right measurement position.
- Ifyou have a friend to help you, you should place your arms naturally on your sides.
- If you are measuring on your own, youneed to use your own hands, but make sure your body is straight.
- If possible, you can stand in front of a full-length mirror to find the right position.
Step 2: Wrap the tape measure around the position you found.
- The part to be measured must not show any signs of being tightened.
- The tape measure cannot be twisted or bent.
- The tape measure should not be too loose while you are measuring.
- Note where the starting marks on the tape measure are when you measure. The starting mark is not necessarily at the edge of the tape measure. Be sure to take the reading from the zero mark to get an accurate bust girth.
Step 3: Make sure that the tape measure is horizontal or vertical to avoid wrong numbers. And whether the tape measure is horizontal or vertical depends on the part being measured.
- Measurements in the horizontal direction(Parallel to the ground): The tape measure should be horizontal, which is parallel to the ground.
- Measurements in the vertical direction(Perpendicular to the ground): The tape measure should be vertical, which is perpendicular to the ground and parallel to the part to be measured.
- Measurements in other directions: If the direction is inclined, find out the starting point and the end point, and use a tape measure to measure. If the direction will be variable, then find out the starting point, the passing point and the end point, and then measure along the points in turn.
Step 4: Record the number of the tape measure on a piece of paper.
Step 5: Follow the above steps to measure a few more times and record the results. Choose the number that occurs most often, which is the size you need.
- If the measured data is quite different, then you should follow the steps to measure carefully, ask a friend for help, or respond to our customer service.
- If you are not sure whether the measured number is correct or within a reasonable range, you can ask our customer service.
Part Three: Necessary Measurements

Basic Necessary Measurements
- Bust

Image Source: freepik
Position: Bust is at the level line of the nipples, which is the most prominent part of your chest.
Measurement Process: Wrap the tape measure horizontally around your chest, but without any signs of compression. The tape measure starts in front or on the side of the bust (under the armpits), goes around, and ends where it started. Then, take several more measurements and read the data at the same location or near the nipples. Choose the number that occurs most often and is relatively large, which is your bust girth.
- If you plan to wear a bra/nubra at the wedding, then you should measure in a bra/nubra. If you don't plan to wear one at the wedding, then you should measure without it.Please don’t wear any clothes when you measure your bust if you don’t want to wear them on the wedding day.
- Waist

Image Source: freepik
Position: Waist girth is about 1 inch above the belly button and below your rib cage, which is the place to measure the standard waist.
- For a figure with less or normal fat distribution in the abdomen, this position is the thinnest.
- For a figure with a lot of fat distribution in the abdomen, this position is not the thinnest, but it also needs to be measured.
- If you do not plan to wear a corset at the wedding, then do not wear it when measuring; however, if you want to wear a corset for your bridesmaid dress at the wedding, then you can wear it to measure and tell us this this situation.
Measurement Process: Wrap the tape measure horizontally around this position. Be careful not to measure your waist girth while inhaling on purpose or to show any signs of tightening your waist. This may lead to poor-fitting or even unwearable bridesmaid dresses. Record the number and follow the above steps to measure a few more times. Pick the number that occurs most often and is relatively narrow, which is your correct waist girth.
- Hips

Image Source: Silver Bobbin
Position: Hip girth is at the largest part of your hips.
Measurement Process: Stand naturally with your legs together. Wrap the tape measure around the largest part of your hips. The tape measure should touch your buttocks but not squeeze them. Also, check that the tape measure is horizontal. If it is not, correct it immediately. Finally, read the numbers. If you are not sure if the number is correct, you can also take several more measurements in or near the same area and choose the largest number from them.
- Hollowto Floor

Image Source: my LIFE and Kids
Position: The hollow-to-floor length (without shoes) is from the hollow space between two collarbones to the floor.
Measurement Process: Stand straight with your feet together. You hold one end of the tape measure (the zero mark) in the hollow space between your collarbones. Then have your partner pull the tape measure vertically to the floor and hold it in place by hand. Finally, the number on the position of the fixed tape measure in your friend's hand is the hollow-to-floor length.
- Height

Image Source: wikiHow
Position: Height is the distance from the top of your head to the floor.
Measurement Process: You can stand naturally against the wall (without shoes). There should be no tilting or bending of your body. Place a ruler or a book horizontally on top of your head and make it touch the wall. Make a mark where it touches the wall. Next, use a tape measure to measure the distance from the floor to the mark. Finally, read out the number on the tape measure, which is your height.
- The ruler, or book, is perpendicular to the wall and parallel to the floor. The spine of the book should be close to the top of the head.
- When making a mark, try to choose one that is erasable or leaves no trace on the wall, such as a pencil or tape that is not harmful to the wall.
- If there is a special instrument for measuring height, the results will be more accurate and convenient.
- The Height of High Heels

Image Source: NANO UNIVERSE
Posotion: The height of a high heel refers to the height of its heel, i.e., from the bottom of the heel to the top of the heel.
Measurement Process: Place your high heels on a flat surface. Pull the tape measure from the top of the heel, starting at the top of the heel, to the bottom of the heel. The resulting number is the height of your high heels.
Additional Measurements for Plus-sized People
- Belly (Biggest Waist)

Position: The belly circumstance is at your biggest waist.
Measurement Process: Place your tape measure around your biggest waist. Keep the tape measure horizontal, and there should not be any signs of strangulation of your belly. Don't inhale for a smaller belly. Reads the number and records it. You can also read the measurement several times to get the most accurate belly circumstance.
For a woman who has either an apple-shaped or diamond-shaped body, belly circumference is generally the thickest part of her waist. Measuring this part allows the waistline of the bridesmaid dresses to be designed to better match the curve of the waist with more fat.
- Hollow to Belly

Position: It is the distance from your hollow space between two collarbones to the belly (biggest waist).
Measurement Process: After determining the location of the belly, you can measure the hollow to belly. If you have a friend to help, you can just stand naturally give the measurement to your friend. If you're measuring yourself, keep your upper body as straight as possible and use a tape measure. You can check that the tape measure is perpendicular to the ground by standing in front of a mirror.
- Butt

Position: If your butt is bigger than your hips, then measuring your butt is necessary. The butt circumstance is measured at your largest butt, about at the bottom of your hips.
Measurement Process: Keep your heels together and stand straight. Keep the tape measure horizontal (parallel to the floor) and circle around this position, neither too loose nor too tight. Record the reading on the tape measure on a piece of paper. If there is a large discrepancy among the numbers, the measurement should be repeated.
Part Four: Sleeve and Partially Sleeveless Measurements

Armhole

Image Source: Tuong Tailor
Position: The armhole girth is a loop at the top of the arm at the joint.
Measurement Process: Start the tape measure at the center of the arm where it joins the shoulder, then run it along the arm, past the armpit, and around the circumference to the starting point. Read the number on the tape measure, which is your armhole girth.
Arm Length

Image Source: threads magazine
Position: Arm length is the length from the shoulder joint, through the elbow, and ending at the prominent outer wristbone.
Measurement Process: Bend your arms about 90 degrees. Then have your friend pull the tape measure from just above the shoulder joint, along the back of the arm to just above the elbow joint, and then pull it in a straight line to the prominent outer wristbone. Read the number on the tape measure, which is your arm length.
- Care should be taken to keep the tape measure tight and not too flimsy when measuring.
- If you want to measure the full sleeve length that suits you, then you can refer to this measurement.
- If you are measuring yourself, you can determine the three points on your arm first and then measure along the points.
Biceps

Image Source: Peridress
Position: Biceps circumstance is measured around the fullest part of your upper arm, which is usually at the peak of your bicep.
Measurement Process: Make sure your arm muscles are relaxed during the measurement. Wrap the tape measure around the thickest part of your biceps, about halfway between the peak of the shoulder joint (the acromion) and the elbow joint. The tape measure should not strangle your muscles and should not be loose. Read the number and take several measurements near the measurement to find the maximum figure, which is your upper arm girth.
Wrist
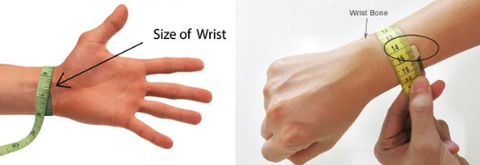
Image Source: LavaRockReykjavik
Position: The wrist girth is at the widest part of your wrist, which is usually around or above the prominent wrist bone.
Measurement Process: With your palms facing up, open or make a fist to make sure you measure out the fullest part of your wrist. Wrap the tape measure around it, but not so tightly that your wrist shows signs of dimpling. After taking the reading, if you are not 100% sure about the area where you are measuring your wrist, you can take several more measurements around the original position and find the maximum size, which is your wrist girth.
Part Five: Hollow to Hem

Position: Hollow to hem is the distance from your hollow space between two collarbones to the hem of the bridesmaid dress. To make it easier for you to know the length of bridesmaid dresses you want, we offer you five follow-to-hem lengths, including mini length, knee length, tea length, ankle length, and floor length.
- It can help you determine the length you want for your bridesmaid dress.
Measurement Process: Place the zero mark of the tape measure in the hollow between the collarbones and hold it in place temporarily. Then have your friend pull the tape measure vertically downward in a smooth motion to the hem you want.
Types of Hollow-to-Hem Length

Tips: Mini hollow-to-hem length (with shoes) is usually more than 31 inches, and floor hollow-to-hem length (with shoes) is usually more than 53 inches.
Dress Length Chart

Part Six: Size Chart

For your shopping convenience, our sizes include US, UK, and EU sizes. In addition, we provide you with lengths in inches and centimeters for your size reference.
Part Seven: Summary
In this article, we have explained how to measure the data needed for the bridesmaid dresses. I believe these measurements will help you know your body shape and will thus be a great help to you in choosing the ideal bridesmaid dresses. If you find our article helpful, it would be our great pleasure!
FAQs
How Can We Measure Bust Size without Using a Measuring Tape?
You can use something else, such as a belt, long shoe string, or ribbon, instead of a tape measure. Wrap it around you, marking the start and end points. Then lay that tool flat and straight and use a ruler to measure out the exact numbers. A sheet of A4 paper measures 8.3 x 11.7 inches, so you can also use it for measuring.
What Is the Process for Measuring Hip Sizes?
- You can find out the widest part of your hips with the help of a full-length mirror and then use a tape measure to take measurements. The tape measure should be parallel to the ground and should not be too loose or too tight. If you don't have a tape measure, you can use a thin belt or a non-elastic thread to take the measurement. When measuring, mark the beginning and end of the hip circumference. Straighten the measuring tool, and then use a ruler to measure the final result.
- Measuring the hip circumference can help you choose the right dress or pants and give you a better understanding of your body shape.
How Can We Measure the Waist-to-Hip Ratio?
First, measure your waist girth and hip girth by using the methods in this article. Then calculate your WHR (the waist-to-hip ratio) by dividing your waist girth by your hip girth.
What Are the Different Sleeve Lengths?
Sleeve lengths include four types: short sleeves, half sleeves, 3/4 sleeves, and full/long sleeves.


0 comments
Related Articles


Error